
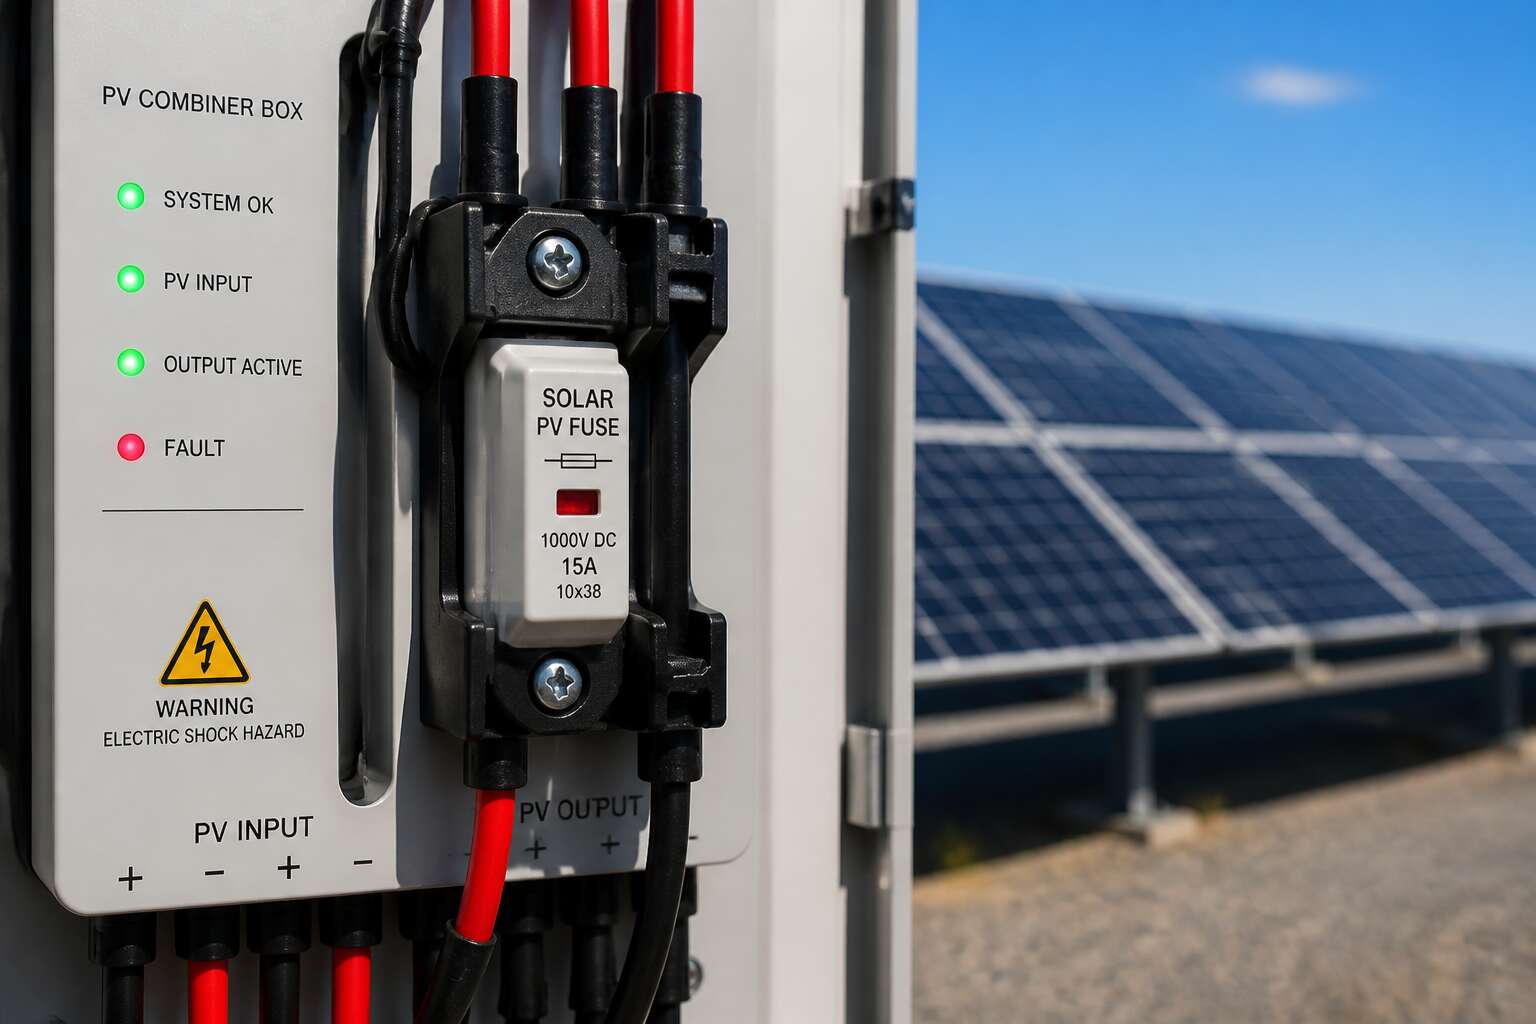
Understanding Overcurrent Protection in Photovoltaic Systems
Why Every Solar Array Needs Overcurrent Protection
A rooftop array in Pretoria can push twenty amps of direct current through a small copper wire. That is enough heat to melt insulation and ignite a ceiling. This is the practical reason why every solar array needs overcurrent protection. Solar panel fuses sit between your modules and your inverter, waiting for the day a fault appears.
Most days, your array operates without drama. The circuit hums along, converting sunshine into usable electricity. Then a squirrel chews through a cable, or a connector corrodes, and the current finds a new path. Without solar panel fuses, that path becomes a glowing streak of metal.
Overcurrent protection handles these moments:
- Current climbs past the wire’s rating.
- The fuse element melts.
- The circuit opens, saving your equipment.
The fuse costs a few rand. The alternative costs a new roof.
The Basic Mechanics of a Fuse in a DC Circuit
A fuse in a photovoltaic system relies on a physical event. A metal conductor with a defined melting point sits inside a ceramic or glass body. When current exceeds the rated threshold, the metal heats until it liquefies and separates. The circuit opens before wire insulation can degrade.
Direct current complicates this process. Unlike alternating current, DC does not naturally drop to zero. The arc created when the fuse element melts persists until the gap grows wide enough to extinguish it. Arc-quenching fillers inside the fuse absorb that energy.
- DC-rated fuses carry higher voltage ratings than equivalent AC fuses.
- They tolerate repeated thermal cycling from variable sunshine.
Solar panel fuses are engineered specifically for these conditions, not adapted from household applications.
Scenarios That Demand Fusing
A single shaded panel can reverse its polarity and draw current from healthy neighbours. That hidden load heats connections and degrades bypass diodes. Solar panel fuses isolate that failing module before damage spreads.
Several common scenarios demand fusing to protect the array:
- Parallel strings where one string suffers a ground fault
- Short circuits within a combiner box
- Mismatched modules creating backfeed current
Each case sends current beyond the conductor’s safe rating. The fuse must open quickly enough to protect both wire and panel. In South Africa’s high irradiance, we see thermal stress making these failures more frequent. Without proper fusing, a minor fault becomes catastrophic.
How to Choose the Right Fuse for Your Solar Installation
Common Fuse Types for Renewable Energy Systems
One blown fuse can take down an entire string of panels. Choosing the right fuse for your solar installation comes down to three numbers: voltage rating, amp rating, and interrupt capacity. Get them wrong and you’ll either blow fuses repeatedly or leave your array without real protection.
South African installers typically work with a few common fuse types for renewable energy systems. The most frequent choices are:
- gPV rated fuses, designed specifically for photovoltaic DC circuits
- HRC (high rupturing capacity) fuses for higher fault currents
- Inline fuse holders for single panel strings
When selecting solar panel fuses, match the amp rating to 1.25 times the panel’s short-circuit current. That margin handles brief surges without nuisance trips. Voltage rating must exceed the system’s open-circuit voltage, especially on cold mornings when panels push higher voltages. I’ve seen oversized fuses fail to protect panels during a short circuit.
Evaluating Voltage and Current Ratings
Most array failures surface at the connection points, not the panels themselves. Choosing solar panel fuses means respecting two separate electrical realities: voltage pushes, current flows. The voltage rating must exceed your string’s open-circuit voltage on a cold morning, when panels produce their highest output. The amp rating should sit at 1.25 times the short-circuit current, giving you headroom for irradiance spikes.
Here is where installers often stumble. They select a fuse based on the cable’s rating rather than the panel’s actual output. That creates a gap where the wire survives but the module suffers.
A practical approach involves a few checks:
- Confirm the system’s maximum voltage under coldest recorded ambient temperature.
- Measure the actual short-circuit current from the datasheet, not the nameplate.
- Verify the fuse’s breaking capacity against the fault current available at the combiner box.
Those numbers tell the real story. Solar panel fuses protect equipment, but only when the ratings reflect your specific site conditions, not the generic specifications from a brochure.
The Impact of Ambient Temperature on Fuse Performance
Choosing solar panel fuses for a South African installation starts with one hard fact: a fuse is a thermal device. Its trip point shifts with ambient temperature. In the Northern Cape summer, a combiner box can reach internal temperatures above 70°C. That alone derates most fuses by 20 percent or more.
Ambient temperature determines whether your fuse holds during normal operation. I once measured a nominal 10 amp string pulling only 7 amps, yet the fuse opened anyway. The enclosure was baking at 65°C. The fuse responded to the environment, not the circuit.
- Check the fuse’s rated ambient temperature, usually 25°C to 30°C.
- Apply the manufacturer’s derating curve to your site’s peak enclosure temperature.
- Compare the adjusted rating against your string’s maximum current.
Matching solar panel fuses to your site’s worst-case heat prevents nuisance trips and silent failures. South Africa’s sun demands it!
Sizing Fuses to Match Cable and Panel Specifications
Choosing solar panel fuses begins with two figures. The first is the panel’s short circuit current, listed as Isc. The second is the cable’s ampacity, which depends on conductor size and insulation. The fuse must sit above the Isc multiplier to avoid tripping during normal operation. It must sit below the cable’s rating to clear faults before the insulation melts.
Many installers oversize fuses to stop nuisance trips. That mistake leaves the cable exposed. I test every string with a clamp meter first. Then I compare the readings against the cable’s continuous current limit. The fuse should stay between those values.
- Read the Isc value from the panel datasheet.
- Multiply it by 1.25 for a safety floor.
- Verify the cable’s ampacity from the SANS 10142 tables.
- Select a fuse above the floor and below the cable rating.
That order prevents silent failures and keeps the array safe.
Inline vs. Holder-Mounted Fuses
Inline fuses are the minimalist route for solar panel fuses. They clamp onto the wire, take up little space, and cost less. Holder-mounted fuses demand a dedicated enclosure, but they offer a more solid connection and a visible place to check for damage. For a rooftop array baked by the Karoo sun, the holder wins.
The choice also affects maintenance. With inline types, you often have to peel back insulation to access the fuse. Holder-mounted units let you pull the fuse out without touching the cable. Consider the following:
- Inline fuses work best in clean, dry spaces, such as a battery room.
- Holder-mounted fuses suit exposed outdoor installations with high UV exposure.
Solar panel fuses come in these two mounting formats, and each demands a different tolerance for fiddly work.
Proper Fuse Sizing and Placement Strategies
Fusing Requirements for Parallel and Series Strings
Fusing a solar array in South Africa is an act of precision, not guesswork. For solar panel fuses, sizing demands a balance between the cable’s ampacity and the panel’s maximum series fuse rating. Place the fuse at the positive terminal for each string, close to the source. In my experience, this limits fault current paths and simplifies maintenance.
In series strings, one fuse protects the entire string, but only when the reverse current exceeds the string’s rating. Parallel strings require fusing on each string to prevent backfeed from other arrays. A single failure in one string can draw current from all parallel branches without this protection.
Consider these rules for placement:
- Place solar panel fuses at the point where the string connects to the busbar.
- Rate each fuse at least 125% of the short circuit current.
- Confirm the fuse interrupts the maximum available fault current.
This placement prevents catastrophic failures.
Optimal Fuse Locations in a Solar Array Circuit
Solar panel fuses demand a deliberate balance between the cable’s ampacity and the panel’s maximum series fuse rating. The 1.25 multiplier for short circuit current is not a guideline, it is a hard floor. In South Africa, where irradiance levels can push a module beyond its nameplate rating, stick to this factor without rounding down. Match the fuse size to the worst-case scenario, not the average sunny day.
Optimal placement starts at the combiner box. Fuse each positive conductor before it joins the busbar. This position intercepts fault current before it backfeeds into a damaged string. Your fuse must also interrupt the maximum available fault current from the entire array, not just a single source. Ignore this specification, and the fuse becomes a decorative component.
The location of solar panel fuses also matters for the negative conductor. Though ungrounded systems in South Africa often omit fusing on the negative side, code-compliant installations may require disconnects on both poles. Consider the physical environment as well. A fuse holder exposed to harsh UV light on a Northern Cape farm will degrade faster than one enclosed in a weatherproof combiner box.
Sizing and placement work together:
– Mount the fuse holder within 1.2 metres of the string’s entry point.
– Verify the interrupt rating against the array’s total short circuit current.
– Seal all enclosures to an IP65 rating to block dust and moisture.
The result is a system that isolates a single fault without crippling the entire generation bank. Each branch remains independent, and power flows from healthy strings while the faulty one is severed.
Integrating Ground-Fault Protection with Fuses
Ground faults rarely announce themselves. A single breach in cable insulation can send leakage current into the earth, and without proper protection, this current goes unnoticed until a fire erupts. Solar panel fuses are not standalone components; they are partners in a broader protection scheme.
Proper fuse sizing and placement strategies must account for the grounded reference point. In South Africa, where many residential arrays use isolated configurations, the fuse on the positive leg works in tandem with the residual current device. If the fuse is undersized, it may blast open before the ground-fault protector registers the anomaly. If oversized, the fault current may not reach a value that triggers a response.
- Confirm the fuse’s breaking capacity against the array’s maximum prospective short-circuit current.
- Verify the ground-fault monitor trips faster than the fuse melts.
Compliance with the National Electrical Code
Compliance with the National Electrical Code demands rigorous attention to both fuse sizing and physical placement in the array. In South Africa, solar panel fuses must withstand the ambient temperature extremes of a rooftop while still protecting the cable. A common oversight is placing the fuse too far from the source of energy, which leaves the unprotected conductor exposed.
The code requires the fuse to be located within an enclosure or at the first accessible point. To simplify compliance, focus on these placement checks:
- Verify the maximum distance from the inverter to the fuse holder meets code.
- Confirm the fuse holder’s DC rating prevents arcing during a fault.
- Check that the fuse location allows for safe replacement without exposing live parts.
Solar panel fuses only provide protection when their location and rating align with the National Electrical Code.
Troubleshooting and Maintaining Your Solar Protection Devices
Symptoms of a Blown Fuse in a PV System
A fuse that opens in a PV system rarely announces itself politely. One morning the inverter display shows String A has vanished, or your monitoring app reveals a 40% drop in yield. The array still works, but at half capacity, mimicking a failing panel or faulty connector. In my experience testing arrays across Gauteng, the culprit usually sits inside a plastic holder.
Physical inspection of that holder helps. Look for a scorched body, melted window, or discoloured cap.
- The multimeter reads zero continuity across the fuse terminals.
- Voltage reads full string potential on one side and nothing on the other.
- The fuse body shows blackened ends from arcing.
The harder case appears when solar panel fuses fail intermittently, opening under load and closing again once the array cools. These erratic readings send installers chasing phantom cable faults. In such situations, solar panel fuses deserve suspicion before any wire gets replaced.
Step-by-Step Diagnostic Approach
Once symptoms point to a possible open fuse, the diagnostic sequence matters more than the individual tests. I always start with the array disconnected and the inverter isolated. A voltage check across each holder tells me which side is live. Then I move to continuity testing, but set the meter to the lowest resistance scale to catch partial failures. Intermittent faults demand a different approach, so I wiggle the fuse body gently while measuring voltage under load. Solar panel fuses that pass bench tests but fail in the field often suffer from degraded contacts inside the holder, not the fuse element itself.
The maintenance routine follows a fixed order:
1. Inspect the holder for corrosion and heat discolouration.
2. Verify torque on all termination screws.
3. Test the fuse with the array under load, not just open circuit.
4. Replace any fuse showing hairline cracks in the ceramic body.
That sequence catches issues before they escalate and keeps solar panel fuses from causing avoidable downtime.
How to Safely Replace a Faulty Fuse
Once diagnostics confirm a faulty fuse, replacement demands the same discipline as diagnosis. Kill the circuit first! Verify zero voltage at the holder with a meter. Trusting a visual check is how arcs happen. Solar panel fuses sit on the live side of the array, so treat every contact as energized until proven otherwise.
Extraction varies by holder type. For lanyard holders, use the designated tool. Never pry with a screwdriver. Inspect the removed fuse element; its failure mode tells you whether the fault was thermal or electrical. Check the holder for carbon tracks and heat discolouration.
Insert the new fuse and ensure full contact with the clips. Torque any captive screws to specification. Re-energize, then measure voltage at the load side. I always watch the meter for a beat. A steady reading means the circuit is sound. Solar panel fuses in coastal South African air demand vigilance against corrosion.
Testing Fuse Continuity with a Multimeter
The multimeter is the most underappreciated tool in your solar arsenal, yet it holds the key to diagnosing solar panel fuses without dismantling your entire array. Testing fuse continuity is a five second procedure that saves hours of head scratching. Set your meter to the ohmmeter mode, which is the symbol that looks like a horseshoe. Touch the probes to each end of the fuse cartridge. A reading near zero ohms indicates a healthy path. An open circuit reading, typically displayed as “OL” or “1”, spells terminal failure for the fuse.
A word on technique. You want solid contact with the metal end caps. Corroded terminals can produce flaky readings that fool you into replacing a perfectly good fuse. This is where South African coastal humidity becomes the silent saboteur. The salt air attacks the fuse clips before it ever touches the element itself. When you get an intermittent reading, clean the contacts first and retest. Here is the critical order of operations:
– Disconnect the array from the charge controller.
– Remove the fuse from its holder.
– Set the multimeter to the continuity mode.
– Place probes on the fuse end caps.
– Listen for the audible beep or watch for a low resistance reading.
That audible beep is your best friend. It cuts through the ambiguity of digital displays and gives you immediate feedback. But remember, continuity on a bench test does not guarantee the fuse will survive under load. A fuse can test fine at low current and still blow the moment the sun hits the panels. This is why I always test the fuse in circuit after reinstallation. The voltage drop across a compromised fuse will reveal itself under operating conditions.
A multimeter is not a luxury item here, it is the difference between guessing and knowing. Solar panel fuses fail silently, there is no warning light and no error code. You only discover the problem when your inverter starts complaining about low input voltage. By then, you have already lost a day of generation. The meter costs less than a single panel and pays for itself the first time it prevents a pointless cable replacement. Get one with a robust probe set, because the clips on cheap test leads snap at the worst possible moment.
Preventing Recurring Nuisance Trips
The recurring nuisance trip is rarely the fuse’s fault. It is a symptom of deeper issues: corroded clips, loose terminals, or solar panel fuses undersized for the ambient heat of a South African roof. The cartridge takes the damage first.
A maintenance routine addresses the holder before the cartridge. Clean the clips with contact cleaner, inspect for discolouration, and verify torque on terminal screws. Heat cycling loosens connections; a loose connection raises resistance and temperature, eventually tripping the fuse. Quarterly checks should include the following:
- Visual inspection for salt residue or burn marks
- Re-torquing terminal screws after seasonal temperature swings
- Replacing holders that show melting or brittleness
Log trip events with date and time to reveal patterns. Midday trips point to a thermally marginal fuse. Post rain trips point to moisture ingress. Solar panel fuses guard the circuit; they should not act on whims. Addressing the root cause restores reliability.
Establishing a Routine Inspection Schedule
South African roofs face intense UV exposure, heat, and seasonal storms. These conditions stress loose connections. A routine inspection schedule protects the entire array by catching small failures before they escalate.
Plan inspections quarterly. For coastal properties, I recommend an additional check during the high humidity months. The routine should follow a simple sequence.
- Confirm solar panel fuses match the original amp rating
- Check wiring insulation near the holder for heat damage
- Inspect for moisture ingress around the fuse cap
- Record the date, time, and ambient temperature
Each visit builds a historical record. Comparing readings reveals subtle degradation. This is how you distinguish between a faulty fuse and a system that needs attention.
Fuse vs. Circuit Breaker for Solar Applications
Speed and Sensitivity of Overcurrent Response
Before we dive into speed, consider this: a fuse typically reacts in under 10 milliseconds. A circuit breaker, by contrast, often needs a full cycle or more to clear a fault. That difference matters in a photovoltaic system, where a delayed response can mean melted connectors or damaged silicon.
Professionally speaking, I prefer fuses when sensitivity is non-negotiable. The thermal response curve of a fuse is closely matched to the thermal capacity of the wiring. Breakers rely on mechanical tripping mechanisms, which introduce inertia. They are also bulkier inside a combiner box and cost more per pole.
Solar panel fuses offer a distinct advantage in detecting low-level faults. Consider the two primary events:
1. A hard short circuit, which draws immense current quickly.
2. An arcing fault, which is a slow burner that slowly rots the insulation.
A breaker waits for the magnetic trip threshold to slam open. A fuse, set at the right rating, will begin to melt and stretch before the arc fully establishes. That temper gives you an edge against fire risk.
Upfront and Long-Term Cost Comparison
Upfront, circuit breakers cost two to three times more per pole than solar panel fuses. They also demand bulkier combiner boxes, which drives up installation labor. A fuse fits into a smaller footprint and costs a fraction of the price.
Over the long term, breakers require mechanical inspection and contact resistance checks. Each trip slightly erodes the contacts. Fuses have no moving parts, so their resistance remains stable until they open. After a fault, you replace a fuse for a few rand, while a breaker might need recalibration or replacement.
The real cost difference shows in fault response. A breaker’s thermal trip curve drifts with age. A fuse stays within specification for its entire service life.
Ease of Reset and Operational Convenience
When a breaker trips, the remedy takes one motion: flip the handle and power returns. That simplicity explains why breakers dominate household boards, and I appreciate it. Solar panel fuses, however, require a moment of reflection.
Replacing a blown fuse is a deliberate act. You remove the holder, examine the element, and insert a new cartridge. This forced pause is the operational advantage. A breaker’s reset is effortless, and that ease can bypass the root cause. With fuses, there is no reset, only resolution.
- A breaker reset takes seconds but repeats without diagnosing the fault.
- A fuse replacement takes minutes and includes a visual check.
- Breakers invite adjusting trip settings, which undermines protection.
For an installer on remote arrays in the Karoo, solar panel fuses protect the system from the installer’s own optimism. The moment it takes to replace a fuse is the moment you understand what failed and why.



0 Comments